Showing posts with label DIY. Show all posts

Wednesday, 10 June 2015

DIY Floral Embellish Leather Clutch Bag


It's been a while since I've done a DIY post so I'm really excited to share this one with you. My sixth form leavers dinner is coming up at the end of the month, and I've had my dress for ages but I was struggling to find the perfect bag- they were either too big, or the wrong colours, so I decided to take things into my own hands and create my own! Here's how I did it:

I picked this plain pouch (real leather might I add!) along with a some fabric flowers in a variety of colours, both from eBay for a really good price. I always go to eBay for craft materials rather than craft stores because you can find much better bargains online. All I did was layer a couple of flowers up, then took a metal split pin through the middle. I then made a small slit in the bag, slotted the split pin in and bent back the prongs inside the bag. I just repeated this process all over, adding flowers all over until I was satisfied with how it looked. It was really just going with my instincts- I didn't have a plan for how I wanted it to look but I was really pleased with how it turned out. I only covered one side of the bag, although you could do both. It was so simple to do but I think it looks so great and you could use whatever colour bag or flowers depending on what kind of look you were going for.

I've also got a fair few flowers left, some of which I have attached to some hair grips which I think will look really cute as a way to tie the whole outfit together. Overall this project cost me less than £15 so I'm really thrilled as not only did I have fun doing it, but it's cheaper than buying a new bag from ASOS for example!


Friday, 23 August 2013

DIY: Cute Cooking Apron

This post is slightly different from what you'll normally see me write about- I've done a couple of DIYs before on this blog but this is the first that isn't really to do with fashion, I hope you'll enjoy it and give it a go anyway.

I'm going to show you how to create a simple apron which is perfect for cooking, because lets be honest- an apron is not just about keeping clean, but looking cute whilst baking too! You need a basic sewing skill (a simple running stitch is all that's needed) or if you have a sewing machine like me, you can use that too.

Materials:


- fabric squares (I picked this up in a haberdashery-2 squares of fabric, each about 1m squared in size)
- 2m ribbon in a corresponding colour

So on to the method:


1. Start by laying out the two pieces of fabric. Place two of the edges together with a slight overlap and pin in place.


2. I used an existing apron as a template, laying it over the fabric, pinning it in place and then cutting around it. I extended the apron slightly in all directions to make sure it would fit me. Plus, make sure you add an extra 2cm onto each edge to allow for seams.


For the next steps I used my sewing machine with black thread and a small running stitch, but equally if you don't own a sewing machine, you can sew a running stitch by hand (it will just take a little longer).


3. Sew straight across the middle of the apron where the two pieces are fabric joined (so it become one piece of material essentially), then remove the pins.


4. Trim off any excess fabric from the reverse side of the apron to keep it looking neat.


5. With an iron, press the seams. To do this, place the apron pattern side down, then fold over each seam about 2cm so you have a straight edge, then press the iron over the top to fold it in place. This ensures that when you come to sewing the seams, you get a neat edge. Do this all the way around the apron.


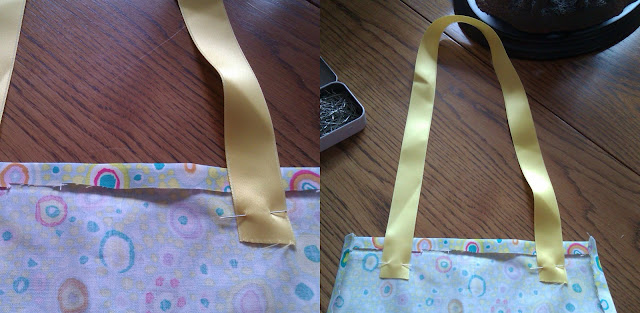
6. Take your ribbon and measure around your neck how long you want the strap to be. I chose yellow ribbon as I think it goes well with the pattern on the fabric. Once you've chopped your ribbon to the length you think, secure it to the top of the apron with pins. Try it on, then you can always move the pins to make it shorter if you need too.


7. I've now switched to a white thread to do the seams. Just sew straight along the edge all the way around, being sure to sew across the ribbon on the top of the apron too. Once done, trim off any excess thread and any excess ribbon.


8. The final part is to attach the waist strap. I used all the remaining ribbon and placed this over the middle seam on the apron to cover up the messy join. Make sure that you have equal amount of ribbon on each side, then pin the ribbon in place.


9. Using white thread again, sew the ribbon in place. I went down one edge, across the bottom, and down the other edge of the ribbon to make sure it stays securely in place. Plus I think the white stitching adds a very cute detail.


Ta-da! An apron made to measure. This is a very simple project but is very worthwhile. I've given these as gifts before as you can customize them so suit different people by using different fabrics and ribbons. Why not have a go and tweet me a picture of the result (@oliviaellen97) as I'd love to see them.

Olivia Ellen XXX

Wednesday, 28 November 2012

How to: Ombre Nails

So today I'm going to show you how to create an ombre effect on your nails. Ombre was a huge trend last summer and this is a great way to work the trend is a subtle yet stylish way.

You will need:
- 2 nail polishes
- base coat and top coat
- a sponge
- a pair of scissors
- nail polish remover

So this takes a little time but it is quite simple to create, and can be done using some many different colour combinations.

To begin with, clean your nails using nail polish remover- I'm using these nail polish remover pads from Boots.


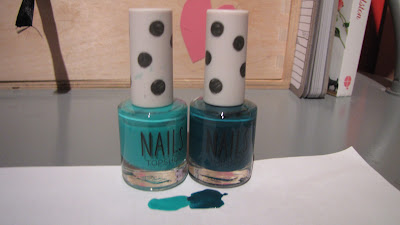
So next you need to decide what colour nail polishes to use. I like to use the same colour but in different shades, however you could use whatever colours you like (try to contrasting ones for a bold look). For this I'm using two Topshop nail polishes- Green Room and Jewel in the Crown, which are two shades of green.


Next apply a basecoat, I'm using Jessica's Reward Base Coat for normal nails.


Next you'll need a sponge- just a normal sponge you would wash with (I bought mine from a supermarket for about 50p). Then using a marker pen, draw a grid onto your sponge and then cut it up into loads of pieces. You'll probably only need one piece for all of your nails, but it's useful to have a lot of pieces so you can practise or do it again and again.


Now on to the nails! Once your basecoat is dry, paint your nails completely using the lightest shade of polish- I like to do two coats with this nail polish so I get a strong even colour.


Now on a piece of paper, pour out a little of the darker shade of nail polish, and dip the edge of your piece of sponge in it.


Alternatively at this point, you could just paint some polish onto the sponge using the brush, but I find it much quicker and easier pouring some out.

Now, using the sponge, dab the polish over the bottom half of your nail. It doesn't have to be perfect, and it should look a little blobby and a little patchy- this is how we want it.


Repeat that for all your nails and let it dry.

Now take your sponge, and start dabbing again, but this time just on the bottom quarter of your nail. This should make it darker and create a gradient.


You may be thinking at this point that it look just like 3 stripes of colour, and so this is where your topcoat come in. Once the polish is pretty much dry (doesn't have to be perfect, as long as it's not sticky it should be fine) apply a clear topcoat all over the nail (I'm using Jessica's Brilliance topcoat) and you should start to see the colours blending together, so the line between each colour is soft.


So there you have your finished ombre nails! I hope you like them, and give them a go- it's so simple.

Variations:
- use one colour nail polish and just make it get darker the further down your nail you go
- use one base colour and then glitter polish to do the ombre effect
- use a fine glitter topcoat.

Go wild, and feel free to send me some pictures of your attempts, (by twitter or email) I'd love to see them!


Olivia Ellen XXX
@oliviaellen97

Friday, 5 October 2012

How to: Dyed and Studded Shirt

Hiya guys! So I've got another 'how to' post for you today, and I'm going to show you how I dyed and studded one of my old shirts. I did this at the same time as my tie dye, and I'm really happy with the result!

To do this you'll need some fabric dye (see my tie-dye post for instructions on how to fabric dye), then a plain white shirt (I used an old school one) and then some studs.

To begin with, I dyed my plain shirt using my pink dye, and then let it dry naturally.


I'm really happy with the colour this came out, and the stitching on the shirt stayed white which makes a really nice detail. I then had to decide where to put the studs, and I decided to apply them to the studs in a collar tip style.


Now start to apply the studs- place your stud where you want it, then push it through the fabric and bend back the pins.


Apply them in a triangle around the collar. To me it didn't matter too much if the studs aren't perfect, because you get that nice homemade look which I like with all my clothes.


So there it is! It was so easy and pretty cheap to do, and means that now I will wear this shirt whereas previously I didn't like it. Feel free to share any of your homemade clothing items with me, I'd love to know what you've got up to!

Olivia Ellen XXX
@oliviaellen97

Sunday, 30 September 2012

How to: Tie Dye!

Hiya guys! So last weekend I did some tie-dying for the second time and it went really well so I thought I would show you how to do it in a simple step-by-step guide. Now tie-dying is by no means a quickly or particularly easy thing to do, but if you have the patience then you can make some really lovely things.

So to tie dye, you will need:
Hand Fabric Dye (I'm using Dylon in Flamingo Pink)

Some elastic bands or some string

250g of table salt

A jug, but one that doesn't matter if it gets tinted the dye colour!

Something to stir the dye with- I'm using a stick, as last time I used a wooden spoon and it's still blue 6 months on!

Some weighing scales

A large bucket or washing up bowl
And of course, some fabric to dye!

Ok, so this tie-dying tutorial is going to be done according to the Dylon dye instructions, so if you are going to use some different dye make sure you follow the right instructions.

1. So to begin with, you need to take your fabric and using your elastic bands you need to tie it up, and you can do whatever patterns you like- how you tie it up all depends on what patterns you will get in the end.  Here are the kind of ways I tied up my t-shirts:


2. Next, fill a sink with warm water and just leave your fabric in the sink to soak.


3. Now to mix the dye: tip the powder dye into a jug and add 500g of warm water. Stir it until dissolved (I used a plastic spoon). 


4. Now fill your bucket with 6 litres of warm water, add the dissolved dye and 250g of salt. Then stir it all up until it's dissolved and then add your fabric (make sure it's still damp from being soaked) and stir it constantly for 15 minutes (very tiring, but this makes sure the fabric gets fully soaked and absorbs all the dye). 


5. So after you have stirred it for 15 minutes you should have started to see that the fabric has absorbed some of the colour, so now you have to stir it regularly for 45 minutes (I stirred it every 8 minutes).

6. Now you need to get your rubber gloves on and take your bucket to a sink where it won't matter too much if you splash the dye around a bit!


7. Now, rinse the fabric off in cold water until the water runs clear and no more dye is coming out of it. Then, undo all your elastic bands and leave your fabric to soak in warm water for about half an hour to an hour. Remove them from the water and let them dry naturally, and then they are ready to wear!

Here are the results:


I'm so so happy with what I got in the end, I think it turned out really really well! I have actually sold two of my t-shirts already, and have one more to sell:


If you are interested just send me a tweet, and I'll tell you all the details. Also I'm going to be making a lot more t-shirts soon so I will let you know how I get on!

Olivia Ellen XXX
@oliviaellen97
Related Posts Plugin for WordPress, Blogger...