You will probably have seen me wearing these shorts on some of my 'Today I'm Wearing' posts, but I didn't actually buy these- instead, I made them out of a pair of old jeans, and in this post I am going to show you how you can customize your own shorts.
Step 1 So first you have to cut your jeans into shorts. I used Topshop's Leigh super soft skinny jeans in black. These had gotten too short for me and I thought they would look amazing as shorts.So i lay them out of the floor, and then measured from the waistband down to how long I wanted them, and repeated on both sides, drew a line, and just cut them with some fabric scissors.
Step 2 So then they were pretty frayed, so I just took some scissors and cut of the stray ends. Now personally, I like a slightly frayed edge (I think it really adds to the grungey look) but if you would rather they were a clean edge, you can fold the edge under, and then hem them, either by hand or with a sewing machine.
Step 3 So that is how you do your basic shorts, but I wanted more. Studs were my first thought. You can buy studs from pretty much everywhere, in little habadashery shops (I know where I live they sell them in House of Fraser) but my secret is eBay. They have studs in every size and colour, and the lowest prices, if you are willing to get them from abroad. I bought a pack of 200 studs for £1.75 from China (http://www.ebay.co.uk/itm/110870673188?ssPageName=STRK:MEWNX:IT&_trksid=p3984.m1439.l2649) which is ridiculously cheap. The only downside I would say is that they took about 3 weeks to come, but I know that some of the sellers will have shorter delivery times, it just depends.
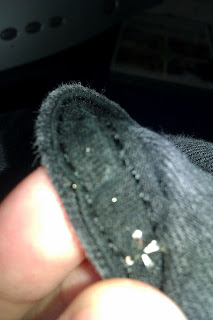
Step 4 Putting these studs in couldn't be simpler. I decided to do them around the pockets on both sides, but you can be creative and put them anywhere (I also like down the side seams and filling the pocket area with studs). The studs have four spikes on the back (this picture shows you what I mean http://i01.i.aliimg.com/img/pb/517/200/463/463200517_627.jpg) Basically, just press these points through the fabric, and then bend them down. I recommend using pliers or something strong to help you do this, and the points van be quite sharp and are difficult to bend with your fingers. If you run your finger over the back of the stud, and you can't feel anything sharp anymore, it is probably in properly.
Step 5 Continue along the pocket line (or wherever you are putting them) and don't worry if they are not perfect. Some of mine were a bit wonky, and the gaps in-between them aren't all the same, but it doesn't matter, as no one will really notice and it just adds to the DIY look.
Step 6 Once you have gone all the way round the pockets with studs of both sides, the backs of the studs should look something like this, with them all pressed down, and the front should look something like...
this! And it really is this easy. I have updated some old jeans that would have been thrown away into something that I wear all the time, and it was really cheap to do so.
I will be putting up some more DIY/customizing posts in a couple of weeks time I should think. so do let me know if you enjoyed this, and if there is anything in particular you want to be able to do. As I said in my previous post, I will be away for two weeks very soon, so probably no blog posts, but I will try and make up for it when I get back!
Olivia Ellen XXX
@oliviaellen97


No comments:
Post a Comment