I'm going to show you how to create a simple apron which is perfect for cooking, because lets be honest- an apron is not just about keeping clean, but looking cute whilst baking too! You need a basic sewing skill (a simple running stitch is all that's needed) or if you have a sewing machine like me, you can use that too.
Materials:
- fabric squares (I picked this up in a haberdashery-2 squares of fabric, each about 1m squared in size)
- 2m ribbon in a corresponding colour
So on to the method:
1. Start by laying out the two pieces of fabric. Place two of the edges together with a slight overlap and pin in place.
2. I used an existing apron as a template, laying it over the fabric, pinning it in place and then cutting around it. I extended the apron slightly in all directions to make sure it would fit me. Plus, make sure you add an extra 2cm onto each edge to allow for seams.
For the next steps I used my sewing machine with black thread and a small running stitch, but equally if you don't own a sewing machine, you can sew a running stitch by hand (it will just take a little longer).
3. Sew straight across the middle of the apron where the two pieces are fabric joined (so it become one piece of material essentially), then remove the pins.
4. Trim off any excess fabric from the reverse side of the apron to keep it looking neat.
5. With an iron, press the seams. To do this, place the apron pattern side down, then fold over each seam about 2cm so you have a straight edge, then press the iron over the top to fold it in place. This ensures that when you come to sewing the seams, you get a neat edge. Do this all the way around the apron.
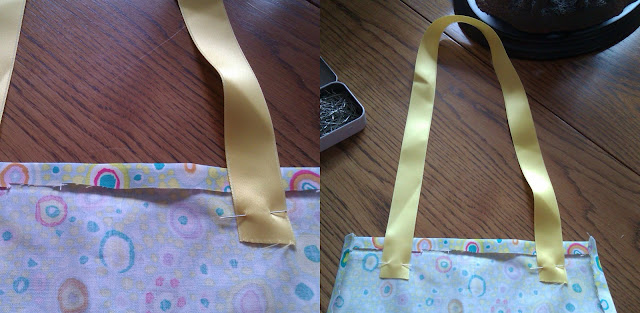
6. Take your ribbon and measure around your neck how long you want the strap to be. I chose yellow ribbon as I think it goes well with the pattern on the fabric. Once you've chopped your ribbon to the length you think, secure it to the top of the apron with pins. Try it on, then you can always move the pins to make it shorter if you need too.
7. I've now switched to a white thread to do the seams. Just sew straight along the edge all the way around, being sure to sew across the ribbon on the top of the apron too. Once done, trim off any excess thread and any excess ribbon.
8. The final part is to attach the waist strap. I used all the remaining ribbon and placed this over the middle seam on the apron to cover up the messy join. Make sure that you have equal amount of ribbon on each side, then pin the ribbon in place.
9. Using white thread again, sew the ribbon in place. I went down one edge, across the bottom, and down the other edge of the ribbon to make sure it stays securely in place. Plus I think the white stitching adds a very cute detail.
Ta-da! An apron made to measure. This is a very simple project but is very worthwhile. I've given these as gifts before as you can customize them so suit different people by using different fabrics and ribbons. Why not have a go and tweet me a picture of the result (@oliviaellen97) as I'd love to see them.
Olivia Ellen XXX


No comments:
Post a Comment